There’s no denying that decals are amazing at revamping your RV. However, they can deteriorate with time and should be removed before it’s too late.
Understandably, you may not feel comfortable removing the decals by yourself due to fear of damaging your RV. Fortunately, you can remove decals from your RV safely and efficiently with a few tested and tried methods.
So let’s dive in and learn not only how to keep our RVs decal-free but also clean and well-maintained overall.
5 Ways to Remove Decals From an RV
We’ve aligned the five best ways to remove decals from your RV. But first, make sure you keep some rags, soap solution, and a plastic scraper by your side. These items are required in almost all of the methods mentioned below.
Additionally, as part of your RV’s exterior care routine, consider addressing those unsightly black streaks that can accumulate over time.
#1 Use Heat to Help Remove Decals From an RV
Heating the decals is a very popular method of removing them. Heat melts the decal and softens them, making removing them easier. A heat gun works best. However, if you don’t have a heat gun, you can always use a hair dryer that functions similarly.
While blowing heat on the decals, you should find an end that you can peel it from with the help of a toothpick. Be careful not to scratch your RV accidentally. Once you have the decal in your hand, you can start peeling it off.
Once you are done peeling the decal off, it’s highly likely that it may not have come off very smoothly. The solution: Use a plastic scraper.
A plastic scraper can help you scrape off any smaller decal pieces without damaging the surface of your RV.
#2 Use Adhesive Removers
Adhesive removers are excellent agents for removing adhesive substances like decals from your RV. The reason that adhesive removers work so well is that they are organic solvents in nature and can dissolve any adhesive substance.
Start by removing the outer layer of vinyl graphics by peeling or scraping it off. Once the outer layer is off, you can remove the sticky gluey part with the help of an adhesive remover.
You should pour the adhesive remover on the decal and spread it on the surface using a rag. Let it stay there for a few minutes.
Once you’ve let the adhesive remover sit for a while, you should proceed to clean the area. A soap and water rinse will help clear up any glue or adhesive remover left on the surface of your RV.
#3 Using an Attached Eraser Wheel to Remove Decals From an RV
An eraser wheel attached to a drill can easily erase the decal from your RV.
The first step is to ensure that the cord of the eraser wheel is plugged into a socket and switched on. Next, apply the eraser to the decal while holding it firmly. You should be careful about keeping a light pressure and moving the eraser swiftly from side to side.
After using the eraser wheel, you should thoroughly check if the decals are removed. If they haven’t been properly removed, you can repeat this process or use a plastic scraper to scrape them off.
#4 Make Use Of the Traditional Solvents
Traditional solvents like mineral spirits or paint thinners can help you remove the decals from an RV by dissolving them directly.
You can choose mineral spirits or paint thinners, depending on your preference. Mineral spirits dissolve the glue residue, whereas the paint thinners work on the exterior surface of the decals.
Soak a rag in the solvent of your choice. Ensure the rag is completely soaked in the solvent and let it sit for a few seconds.
Note: You should not just directly pour the solvent on the decal because that would be ineffective and a waste of these solvents
After you’re done soaking the rag in the solvent, you should place the soaked rag on the decal. Solvents will take some time to work on the surface where it is being applied. So, you should let the soaked rag sit on the decal for a few seconds.
To remove the decal, you should start scraping it right after you’ve removed the rag. The point is to perform the task before the organic solvent evaporates into the air.
#5 Use a Knife to Remove the Decals
You can also use a good old knife to remove the decals from your RV. However, keep in mind that you can scratch the smooth surface of your RV when using a knife to remove the decal. I
Start by heating a putty knife for around 5-6 minutes. Use the hot knife to scrape off the decal. Be careful not to damage the RV surface while using the putty knife to scrape off the decal.
Once you’ve removed the decal with the putty knife, you should immediately clean the area. This would ensure that the surface of the RV isn’t sticky anymore.
How Do You Remove Dried Up Decals?
You should start by thoroughly cleaning the surrounding area of a decal and patting it dry. Next, start picking off the decal from the weaker points, such as its corners.
Once done with that, you should use the blow-dryer to heat the decal and make it softer. Before you remove the decal, you should wipe it thoroughly with WD-40 to further loosen the edges of the decal. Finally, scrape it off with the help of a plastic scraper.
How Do You Remove Decals Without a Heat Gun?
One way is to add some hot water to the surface of the decal and use a cloth to soak it for a while. Another way is to boil some water and then directly pour that water on the decal. Both of these methods can be effective in loosening the adhesive.
You should know that these methods may not be as effective as a heat gun or a blow dryer. It would be time-consuming and may even take multiple rounds of hot water to do the job. However, these methods can work as an alternative to a heat gun.
What Is the Best Decal Remover?
Using adhesive removers is considered the best method of removing the decal. There are many high-quality adhesive removers in the market, such as Goo Gone Orignal Liquid or Un-Du Formula Sticker Tape and Label Remover.
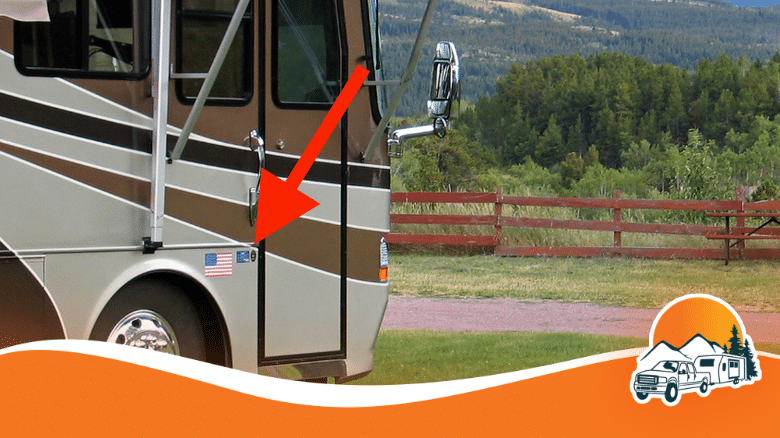
Can Vinyl Decals Be Removed?
Yes, vinyl decals can be removed. You can use a heat gun to loosen the adhesion and scrape the vinyl decals with a plastic scraper.
Conclusion
Old decals can ruin the aesthetics of your RV. Fortunately, removing decals from your RV isn’t hard. Besides enhancing the appearance of your RV, removing decals will also help maintain the integrity of its surface.
So what are you waiting for? Follow the steps mentioned in this guide, and you will have a decal-free RV in no time!